Whether you have been playing Meshtastic for a while or just getting started, use this guide for some tips on getting the best results connecting to the WPAMesh.
First Things First: Firmware
First things first, let’s make sure you’re on the latest firmware version. You can check what the latest firmware revision is on the official Meshtastic Github by checking the right side of the webpage for an area that says “Releases”. The releases area looks like this:
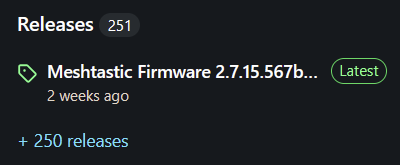
Note, the picture above shows version 2.7.15.xxx, which probably is not the latest version depending on when you’re reading this guide! But take note of the bright green “Latest” logo next to the firmware version. That’s your indicator that this is the latest stable version.
From here, if you like a challenge, you can download the entire release package and flash the firmware on your own using a command-line tool or other software…. orrrrrr you can take the easy route!
The easy route is by using the official Meshtastic Firmware Flash Tool! This website works only on Chrome-based or Edge browsers because Meshtastic is using something called WebSerial API, which only those browsers support at the time of writing. This WebSerial API allows your web browser to communicate directly with a serial device connected to your computer – so you don’t have to worry about complicated command-line tools to get up and running.
A problem you might run into: missing device drivers.
If you try to flash your device and it doesn’t show up as a COM port in your browser’s dialog, you might need to install the necessary drivers to communicate with your device’s onboard USB to Serial converter chip. The most common drivers are available on this page hosted by Meshtastic. Note there are different drivers depending on what kind of device you have!
WPAMesh’s Modem Preset
The modem preset is basically the “speed” in which your device can communicate with others. Think of it like the baud on your old dial-up modem. There was 1.2Kbaud, then 2.4kbaud, then finally 56Kbaud before DSL came along. Each of those data rates could send data faster, and therefore you could update your MySpace page with the latest mirror selfie daily instead of monthly.
Meshtastic has many different presets for speed. At the time of writing there is:
- SHORT_TURBO
- SHORT_FAST
- SHORT_SLOW
- MEDIUM_FAST
- MEDIUM_SLOW
- LONG_FAST
- LONG_SLOW
- VERY_LONG_SLOW
These presets are named after their range and data rates. The first word indicates the range, while the second word is an indication of the data rate. That’s not entirely correct, but the Meshtastic team thought it to be beneficial to use words to describe the presets, instead of numbers. This way it’s a little easier to understand what’s going on in the background, without needing a degree in data sciences.
Generally, you will find most meshes default to LONG_FAST, as the Meshtastic team determined this to be the best preset for devices to use out of the box. It gives the best range without compromising speed too much for a small mesh or just a few devices. However, you may find that in areas with really dense meshes, they may have chosen to migrate to a faster preset to keep the airwaves clear enough for reliable communication. Since a ton of devices mean that the long-range isn’t needed quite as much since you can reliably hop between others to get to a destination.
In the case of WPAMesh, we are on LONG_FAST.
Channels
Channels are kinda like little “rooms” within the much larger mesh ecosystem. By default, each modem preset as discussed above will have a channel with the same name. WPAMesh is on the LONG_FAST preset, so by default, you should have a “LongFast” channel in your device as channel 0. If you were on another preset, you would have that preset’s name as the default channel instead. It’s also important to note that channel 0 is the one in which your devices exchange telemetry data – it is the Primary. So if you don’t have the respective modem preset’s default channel somewhere in your list, you will never see any other nodes in your list, and they won’t see you!
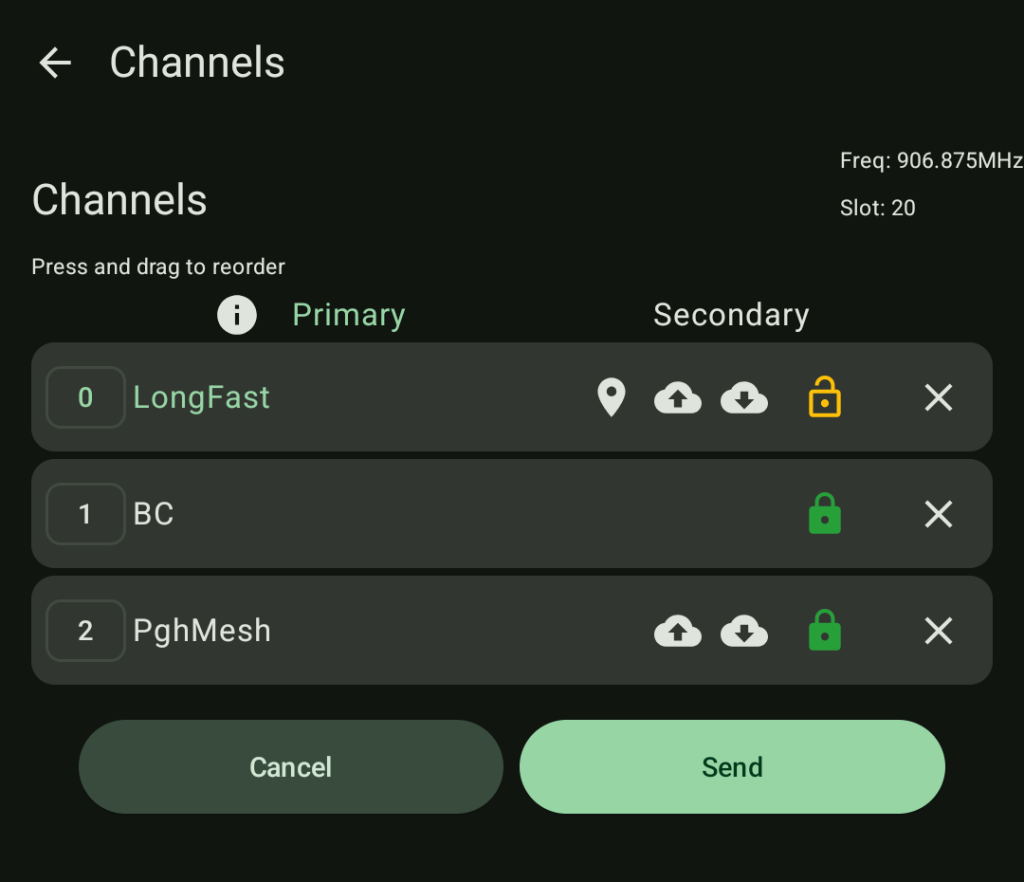
Take a look at the picture above. You can see three channels defined. LongFast is channel 0 – this is the default. Since it is in slot 0, it will be the channel in which this node broadcasts it’s name and other data. It will also be the channel which receives telemetry data from other nodes. You could put this LongFast channel in a different slot, but that would mean other mesh users would not see your node! Packets will still be rebroadcast, however the node’s name will be invisible. (There are some benefits to this config, but they are not pertinent to this guide.)
You can also see two other channels named “BC” and “PghMesh”. These also show a green lock icon next to them. The green lock icon indicates these are encrypted channels – meaning data sent over them will not be observable by other mesh users. To observe messages in these channels, you must posses the encryption key, which can easily be shared with the built-in QR code generator, or via another secure means of communication.
Speaking of encryption keys, and despite the yellow ‘unlock’ icon next to LongFast, this channel does have encryption! The difference is it’s shared with everyone, so that’s why the lock icon is that way – to indicate messages are not private since everyone has the key. With that said, it’s important to ensure your LongFast channel has the correct encryption key.
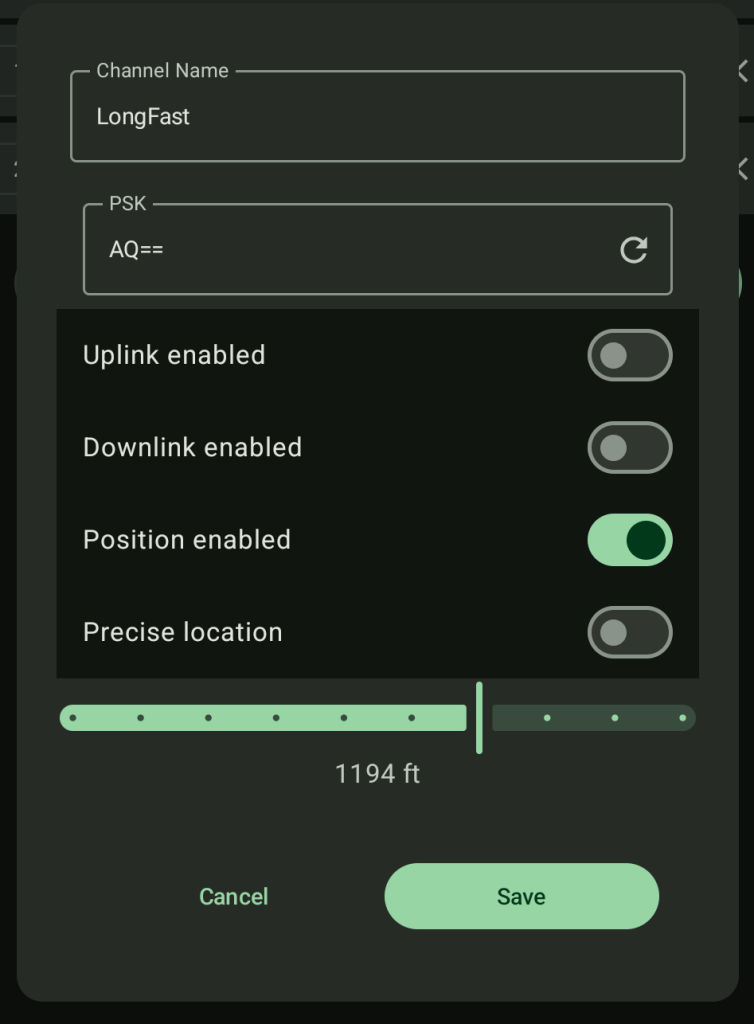
LongFast, and all other presets use the encryption key AQ==. This key must be present, and your channel name must match to exchange communications. Again, all of this should be configured by default, but just in case it’s not you can double check using the image above. It is on this page you can also adjust the precision of your location broadcasts. Some folks don’t wish to share their precise location, so they obfuscate it by a certain amount. You can see in the image above, the precision is set to 1194 ft. This will show as a 1194 ft. bubble around the node on the node map.
Altitude, Altitude, Altitude!
Height, that is!
Pennsylvania’s geography is challenging! Especially in the central-western parts where the edge of The Appalachian Mountains makes the ground all wavy. Radio frequency energy (RF) doesn’t go through dirt very well. And as it turns out, the LoRa radios we use for Meshtastic communication generally use only 21dBm (~130 miliwatts) of power. For perspective, some cell phones can use up to 3000 milliwatts in areas with weak signal. The legal limit for Meshtastic encrypted communication in the US (915Mhz band) is 1 watt, or 30dBm peak transmitter power. Some radios support this, but the majority of low-power radios are perfectly functional without the power. Regardless, 1 watt still isn’t that much RF energy in the grand scheme! LoRa is just an incredibly efficient protocol which allows for such resilient communication at long distance and low power levels.
With all of that said, it is crucial to get your antenna up high. If you’re surrounded by earth, trees, or buildings the signals your radio sends will have a very hard time getting out, and the ones sent by others will have an even more difficult time reaching you!
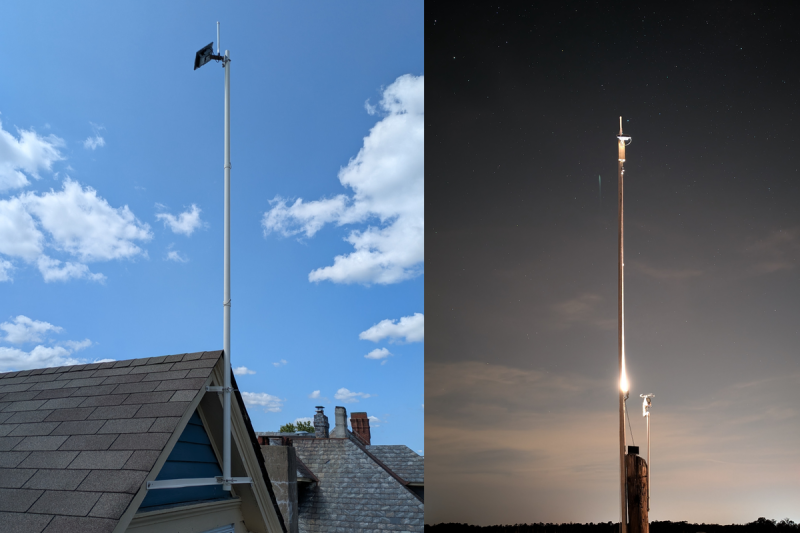
Many folks who live in challenging terrain opt to put a solar-powered node on their roof. Since Meshtastic operates by rebroadcasting packets, the roof node could act as a gateway to the outside world, rebroadcasting the ones from a node you keep indoors to the outdoor one, and vice-versa. If you have trouble getting out, this option might work for you! Try playing around first though, take your node to a hilltop, or a high building first to see if anyone’s in your area.
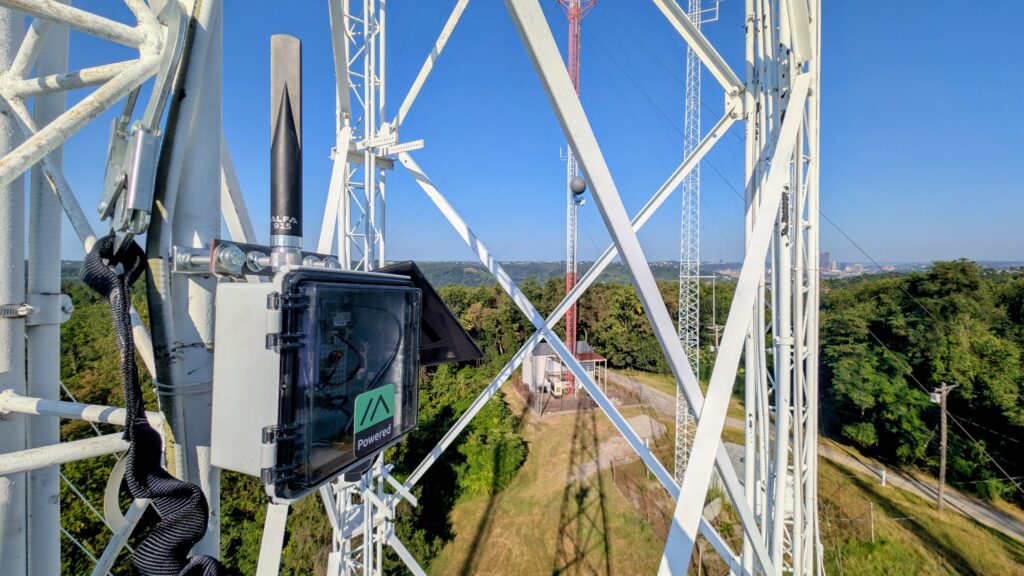
The biggest thing to consider when deploying a stationary node is keeping your coax cable as short as possible. 900mHz does not bode well when traveling long distances because the losses are very high at this frequency for some of the most common types of coaxial cable.
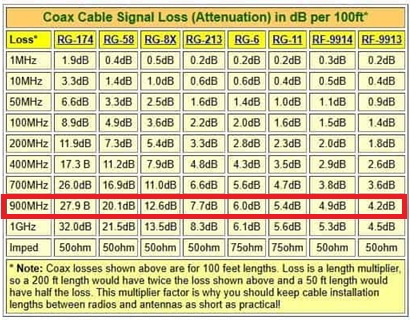
To have minimal losses on 900Mhz, you must use very thick (and often-times expensive!) coax cable for the best performance in this frequency band. Those are the most common forms of coaxial cable. RG-174 is about the size used with most SMA-type cable connections. And RG-58 is incredibly common in the amateur space since it is very affordable and has acceptable losses in the 70cm band and below.
Since our power levels are so low, it’s imperative to retain as much signal as feasible in your situation. Therefore, you want to keep your coax cable as short as possible. If you can afford to put your radio and your antenna right next to each other, do it! And remember, the best kind of radio is a good antenna.
Final Words
We hope this guide helps you get connected to others situated in our awfully challenging environment. We think it’s a fun challenge to learn the best way to communicate long distances using just the tools at your disposal. Chances are you might need to use your imagination a little bit to figure out a way to make it happen if you’re having trouble right out of the box. But that’s part of the experience!
We implore you to join our Discord server for ideas and help getting online. We have a rapidly growing community of very bright-minded folks who have been in your shoes before!
In the meantime, we hope to see you on the air!